2012/05/04(Fri)マルチホーム環境のLinuxサーバでポリシールーティングを行う方法
2012/05/04 19:23
はじめに
自宅サーバを立てる上での問題の一つにIPアドレスをどうするかという問題がある。通常プロバイダから付与されるIPアドレスは、PPPoEする度に違うグローバルアドレスが振られる*1が、変動するIPアドレスではDNS権威サーバやメールサーバを運用することは事実上困難で、やはり固定IPアドレスを用意したい。
一般的に固定IPの提供は高価ではあるが、例えばi-revoのように帯域制限(5GB/day)を設ける代わりに月525円という破格のISPサービスもある。
そこで、DNS権威サーバ/メールサーバ程度向けにはこちらの回線を使い、その他のファイルストレージ系には通常のISPを利用するというサーバを作ってみる。
環境
全体のイメージ図はこんな感じ。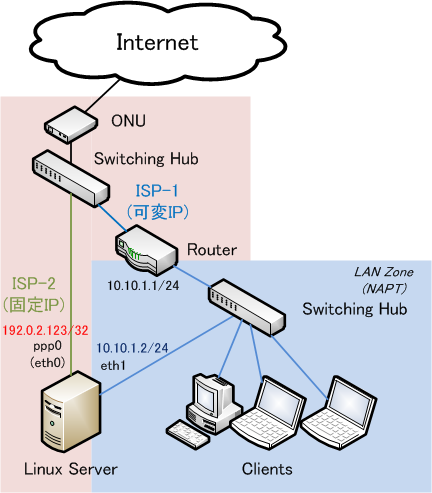
左下のLinux Serverが今回の主役。OSはFedora 16 x86を使用。
これまではISP-1のRouter配下にNAPTでぶら下げて公開していたところを、固定IPアドレス環境のISP-2のためにNICをもう1枚差した格好になっている。*2
eth0の上流が(帯域制限のある)固定IP環境(ISP-2)、eth1の上流は変動IP環境(ISP-1)という風にする。
通信のポリシールーティングは以下のようにしてみる。
- DNS権威サーバやメールサービスは、ISP-2側の固定IPアドレス192.0.2.123/32で行う
- Webサーバやファイルストレージサービス等、IPアドレスが変動してもDynamic DNSでrecoverできる程度のサービスは、ISP-1側の変動IPアドレスNAPT配下の10.10.1.2/24で行う
下準備
ISP-1のRouter
そもそも2つのISPをLinux Serverで裁くという方法もあるにはあるが、pppが2つになってややこしいし、サーバが死んでしまうと生活セグメントもインターネットから切れてしまうので、ISP-1側は既存のルータを利用することに。一般的にPPPoEを叩いて、下にNAPTで10.10.1.1/24を吐くだけなので簡単。後は、80番や22番など、サービスに必要なポートを10.10.1.2に向けてやるようにstatic NAPTを設定する。
ISP-1側の静的IP設定
このLinux Serverから通信を発するときは、帯域制限のないISP-1側を使いたいので、デフォルトゲートウェイがISP-1側のRouterへ向くように設定(太字部分)しておく。# vim /etc/sysconfig/network-scripts/ifcfg-eth1 DEVICE="eth1" HWADDR="★MACアドレス★" ONBOOT="yes" NM_CONTROLLED="no" TYPE=Ethernet BOOTPROTO="none" IPADDR="10.10.1.2" NETMASK="255.255.255.0" BROADCAST="10.10.1.255" NETWORK="10.10.1.0" GATEWAY="10.10.1.1" IPV6INIT="yes" IPV6_AUTOCONF="yes" IPV6_PEERDNS="yes"
ISP-2側のPPPoE設定
rp-pppoeというパッケージをインストールして、pppoe-setupコマンドで設定する。iptablesは後で適宜設定のこと。
# yum install rp-pppoe

# pppoe-setup

------------------------------------------------------------------
Welcome to the PPPoE client setup.  First, I will run some checks on
your system to make sure the PPPoE client is installed properly...


LOGIN NAME

Enter your Login Name (default root): ISP-2の接続ID


INTERFACE

Enter the Ethernet interface connected to the PPPoE modem
For Solaris, this is likely to be something like /dev/hme0.
For Linux, it will be ethX, where 'X' is a number.
(default eth0): eth0


Do you want the link to come up on demand, or stay up continuously?
If you want it to come up on demand, enter the idle time in seconds
after which the link should be dropped.  If you want the link to
stay up permanently, enter 'no' (two letters, lower-case.)
NOTE: Demand-activated links do not interact well with dynamic IP
addresses.  You may have some problems with demand-activated links.
Enter the demand value (default no): no


DNS

Please enter the IP address of your ISP's primary DNS server.
If your ISP claims that 'the server will provide dynamic DNS addresses',
enter 'server' (all lower-case) here.
If you just press enter, I will assume you know what you are
doing and not modify your DNS setup.
Enter the DNS information here: server


PASSWORD

Please enter your Password: ISP-2のパスワード

Please re-enter your Password: ISP-2のパスワード


USERCTRL

Please enter 'yes' (three letters, lower-case.) if you want to allow
normal user to start or stop DSL connection (default yes): no


FIREWALLING

Please choose the firewall rules to use.  Note that these rules are
very basic.  You are strongly encouraged to use a more sophisticated
firewall setup; however, these will provide basic security.  If you
are running any servers on your machine, you must choose 'NONE' and
set up firewalling yourself.  Otherwise, the firewall rules will deny
access to all standard servers like Web, e-mail, ftp, etc.  If you
are using SSH, the rules will block outgoing SSH connections which
allocate a privileged source port.

The firewall choices are:
0 - NONE: This script will not set any firewall rules.  You are responsible
          for ensuring the security of your machine.  You are STRONGLY
          recommended to use some kind of firewall rules.
1 - STANDALONE: Appropriate for a basic stand-alone web-surfing workstation
2 - MASQUERADE: Appropriate for a machine acting as an Internet gateway
                for a LAN
Choose a type of firewall (0-2): 0 (後で設定)


Start this connection at boot time

Do you want to start this connection at boot time?
Please enter no or yes (default no): yes

** Summary of what you entered **

Ethernet Interface: eth0
User name:          ISP-2の接続ID
Activate-on-demand: No
DNS addresses:      Supplied by ISP's server
Firewalling:        NONE
User Control:       no
Accept these settings and adjust configuration files (y/n)? y
Adjusting /etc/sysconfig/network-scripts/ifcfg-ppp0
Adjusting /etc/ppp/chap-secrets and /etc/ppp/pap-secrets
  (But first backing it up to /etc/ppp/chap-secrets.bak)
  (But first backing it up to /etc/ppp/pap-secrets.bak)


Congratulations, it should be all set up!

Type '/sbin/ifup ppp0' to bring up your xDSL link and '/sbin/ifdown ppp0'
to bring it down.
Type '/sbin/pppoe-status /etc/sysconfig/network-scripts/ifcfg-ppp0'
to see the link status.
完了すると、/etc/sysconfig/network-scripts/ifcfg-ppp0に以下のような設定が出来ている。USERCTL=no BOOTPROTO=dialup NAME=DSLppp0 DEVICE=ppp0 TYPE=xDSL ONBOOT=yes PIDFILE=/var/run/pppoe-adsl.pid FIREWALL=NONE PING=. PPPOE_TIMEOUT=80 LCP_FAILURE=3 LCP_INTERVAL=20 CLAMPMSS=1412 CONNECT_POLL=6 CONNECT_TIMEOUT=60 DEFROUTE=yes SYNCHRONOUS=no ETH=eth0 PROVIDER=DSLppp0 USER=myusername@isp-1.example.com PEERDNS=yes DEMAND=no負荷軽減のためにカーネルモードPPPoEを利用する設定と、デフォルトゲートウェイの設定をしないように変更。(太字の部分)
USERCTL=no
BOOTPROTO=dialup
NAME=DSLppp0
DEVICE=ppp0
TYPE=xDSL
ONBOOT=yes
PIDFILE=/var/run/pppoe-adsl.pid
FIREWALL=NONE
PING=.
PPPOE_TIMEOUT=80
LCP_FAILURE=3
LCP_INTERVAL=20
CLAMPMSS=1412
CONNECT_POLL=6
CONNECT_TIMEOUT=60
DEFROUTE=no

SYNCHRONOUS=no
ETH=eth0
PROVIDER=DSLppp0
USER=myusername@isp-1.example.com
PEERDNS=yes
DEMAND=no
LINUX_PLUGIN=/usr/lib/pppd/2.4.5/rp-pppoe.so
ポリシールーティング
何も考えずマルチホームにしようとすると、デフォルトゲートウェイを2つ設定して…なんて間違った設定をしてしまいやすいが、これではうまく通信できない。デフォルトゲートウェイが同じメトリックで2つ設定されていると、どちらが選ばれるかは分からないので、外部からISP-1側には繋がるのにISP-2側にはpingが返ってこないとか、それが逆転したり、繋がったり繋がらなかったりという不安定な状況が起こってしまう。
今回のような構成で、パケットを受信したISP側で応答を返すには、ルーティングテーブルを動的に切り替えてやる必要がある。
そのために、メインのルーティングテーブル($ route -nで表示されるもの)とは別なルーティイングテーブルを作る。
以下のルーティングテーブル定義に、0より大きく253より小さい値のテーブルを定義する。
ルーティングテーブルを参照する際、数字の小さい順に判定されてゆく。
#  vim /etc/iproute2/rt_tables


#
# reserved values
#
255     local
254     main
253     default
0       unspec
#
# local
#
#1      inr.ruhep
202     isp-2
次に、ppp0側のルーティングを吸い込むテーブルを定義する。
以下にISP-2の固定IPアドレスを書く。
#  vim /etc/sysconfig/network-scripts/rule-ppp0

from 192.0.2.123 table isp-2
最後に吸い込んだisp-2テーブルでの経路を書く。
pppはPoint to Pointなので、Gatewayは書かずともdev ppp0に向けてやるだけでよさそう。
#  vim /etc/sysconfig/network-scripts/route-ppp0

default dev ppp0 table isp-2
確認
ここまで設定したら、networkサービスをrestartさせて、正しくリンクが上がるかを確認。その後、外部からそれぞれのISP-1側の公開ポート、ISP-2側へpingなどしてみて、正しく通信できるかをテストする。
# ip route show table main

default via 10.10.1.1 dev eth1
169.254.0.0/16 dev eth0  scope link  metric 1002
169.254.0.0/16 dev eth1  scope link  metric 1003
10.10.1.0/24 dev eth1  proto kernel  scope link  src 10.10.1.2
★PPPサーバ★ dev ppp0  proto kernel  scope link  src 192.0.2.123

# ip route show table isp-2

default dev ppp0  scope link
さらに、追加したルーティングテーブルがmainより小さいことを確認。
rt_tablesの名前を色々変更すると、どんどん複製が出来ていくので、# ip rule del from xxx.xxx.xxx.xxx. lookup xxxxxxxとやって不要な物を削除すること。
# ip rule

0:      from all lookup local
32762:  from 192.0.2.123 lookup isp-2
32766:  from all lookup main
32767:  from all lookup default
おまけ
ちなみに、デフォルトゲートウェイをISP-2ではなくISP-1にしたい場合は、onlinkな経路をroute-eth1に書き忘れないように注意。まず、ifcfg-eth1のGATEWAY行を削除、ifcfg-ppp0のDEFROUTEをyesに変更。
ポリシールーティングは、ISP-1側に読み替える。
#  vim /etc/iproute2/rt_tables


#
# reserved values
#
255     local
254     main
253     default
0       unspec
#
# local
#
#1      inr.ruhep
201     isp-1
eth1側のルーティングを吸い込むテーブルを定義は、ISP-1の固定IPアドレスに読み替えて書くだけ。
#  vim /etc/sysconfig/network-scripts/rule-eth1

from 10.10.1.2 table isp-1
上記と違うのがここ。
10.10.1.0/24の経路を書き忘れないように。
さもないと、ISP-2側から通信しようとして応答が無くなる。
#  vim /etc/sysconfig/network-scripts/route-eth1

10.10.1.0/24 dev eth1 src 10.10.1.2 table isp-1
10.10.1.0/24 dev eth1 src 10.10.1.2
default via 10.10.1.1 table isp-1
参考文献
CentOSでマルチホームのルーティング設定 ≫ gmt-24.net指向性メモ::2010-12-15::iptablesとiproute2を使ってマルチホーム環境でNAT内のサーバーをうまく公開する方法